Components and Physical Layout
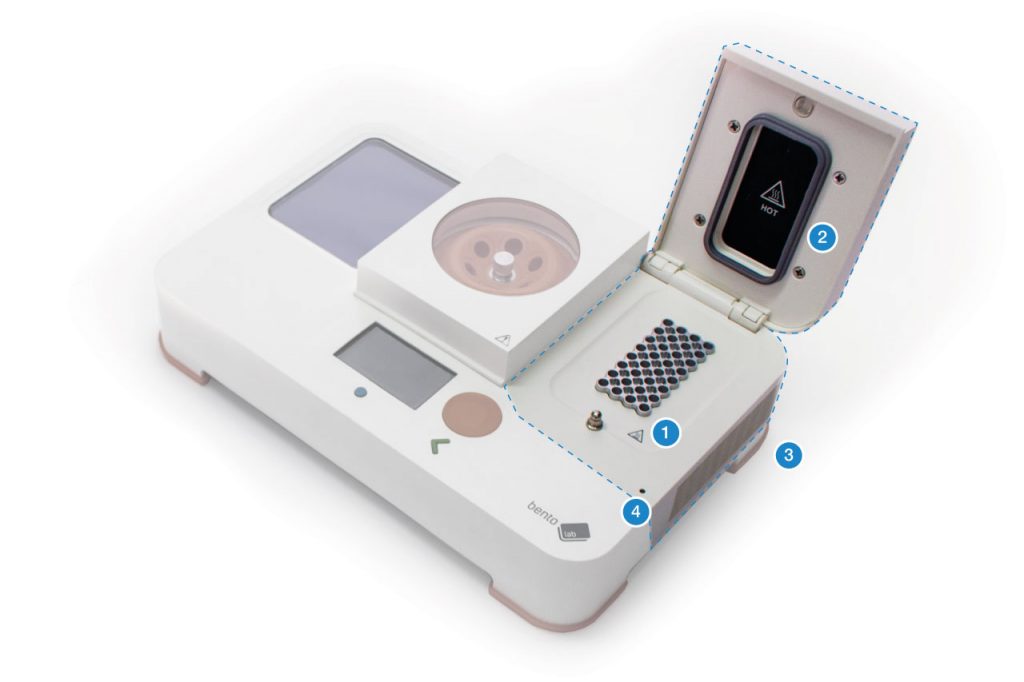
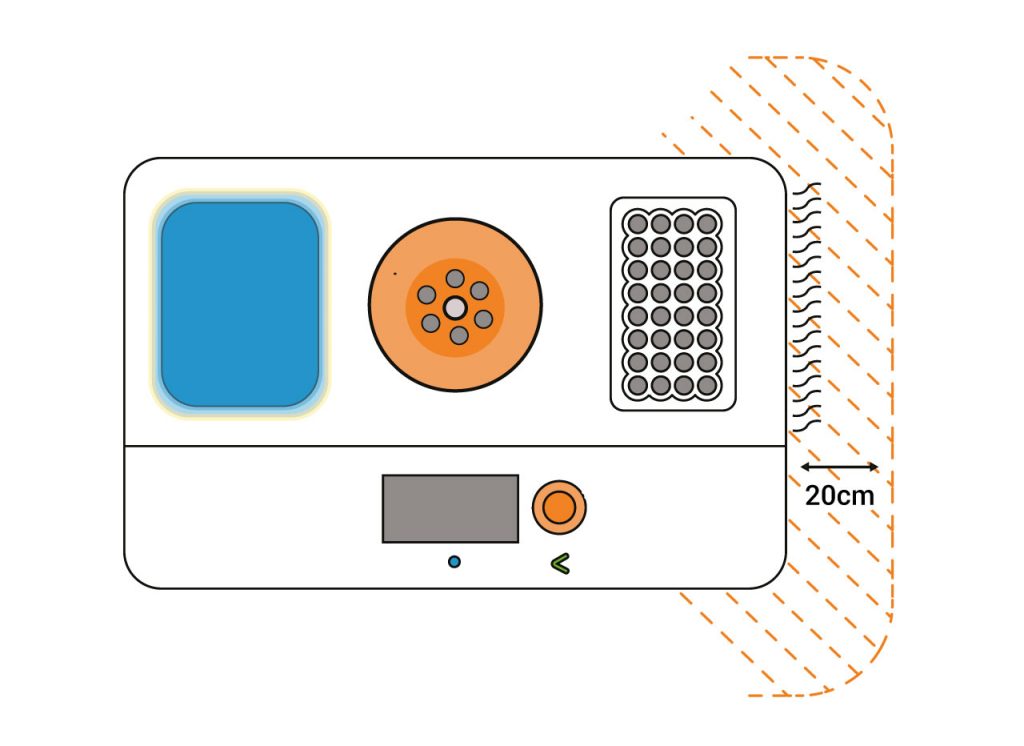
The thermocycling module is on the right side of the Bento Lab system. The thermocycling block (1) fits 0.2 mL tubes with flat or round caps in a 4 x 8 arrangement. Strip tubes can be fitted. The heated lid (2) is sprung and adjusts automatically to fit tubes. A fan is used to move heat out of the system through air vents (3) on the right side. Ensure that no objects obstruct the air flow to prevent overheating (keep 20cm distance from the device indicated below).
Safety Advice: An indicator light (4) shows that the system is active or still hot. Whenever the light is on, extra caution is advised when opening the lid, as elements like the heat block or the heated lid are likely to be very hot.
Specifications
| Details | |
|---|---|
| Capacity | 32 × 0.2 mL tubes |
| Thermal Cycling | Peltier temperature control, active cooling |
| Temperature Range | 12 – 99 °C |
| Heated Lid | 120 °C / ambient (off) |
Getting Started
The Bento Lab Thermocycler module is ready to use out of the box, without any need for extra equipment or software. Everything can be programmed and configured directly from the on-board graphical interface using Bento Lab’s intuitive click-wheel button.
To get started, turn on your Bento Lab using the power switch at the back. After a moment, the Bento Lab status screen comes up, displaying the three module icons (left: Gel Electrophoresis, centre: Centrifuge, right: Thermocycler). Click on the Thermocycler icon to activate the module. This brings up the Thermocycler screen.
The Thermocycler screen shows status information about the current state of the module at the top half of the screen, such as the temperature of the block and lid. When the module is running a protocol, the remaining time estimate is also displayed.
When the module is idle, the bottom buttons are used to open the Thermocycler protocol editor. The first two buttons open the editor with a default PCR protocol 1 or a default heat block protocol 2. The disk button 3 on the right leads to a list of all the previously saved Thermocycler protocols.
(Note: Some Bento Lab Devices require 45 seconds to 1 min of initialisation time after being turned on before the Thermocycler protocols become available.)
When the module is running, the bottom buttons change. The inspection button on the left 4 can be used to see the precise position in the currently running program. The cancel button on the right 5 is used to end the program and can be used either to cancel it, or to turn the module off when it is on a final holding step.
Loading Samples
Before loading samples, ensure that the heat indicator light of the module is off. This means that the lid is safe to open and that no element is hot.
- Open the Bento Lab Thermocycler lid. The lid opens easily with little resistance.
- Load PCR tubes (0.2 mL) into the block. Up to 32 tubes can be loaded. If the protocol makes use of the heated lid, ensure that all PCR tubes have the same height, so that the heated lid applies evenly when the lid is closed.
Ensure that the Thermocycler block is clean and no dust or other elements prevent contact between the block and the tubes. Ensure that PCR tubes sit tightly in the block. - Close the lid and ensure it is fully engaged.
Creating, editing, storing and running protocols
Protocols for the Bento Lab Thermocycler can be created and edited directly on the Bento Lab, without the need for external devices. Protocols can be named and stored for later re-use.
Creating a new protocol
To create a new protocol, start by choosing the default PCR protocol from the Thermocycler menu. This will open the editor pre-loaded with default settings.
Alternatively, when using the Bento Lab Thermocycler as a heat block, a convenient default protocol that contains only one temperature step is available.
After selecting the PCR protocol the screen shows a graphical representation of the protocol. At the bottom right of the screen, several buttons are visible. Initially, three options are given:
- Editing: The left button with the spanner icon 1 unlocks the protocol for editing.
- Storing: The middle button with the disk icon 2 gives the option of naming and storing the protocol.
- Running: The right button with the start icon 3 will activate the module and begin running the protocol.
Editing a protocol
From the default protocol view, click on the spanner icon.
The three buttons on the bottom right disappear. Instead, the first temperature stage is highlighted and the precise properties of the stage are displayed below. Using the orange click-wheel you can now scroll through each stage in the protocol. The detailed properties at the bottom of the screen change accordingly.
To return to the default protocol view in order to save your changes or run the protocol, push the green back button.

Making changes to a temperature stage
- Highlight the temperature stage you want to change by scrolling to it with the orange click wheel.
- Push down the orange click wheel. The temperature stage is now selected and the properties are editable.
- To make changes to the temperature, select the temperature value button. Push down the orange click-wheel and keep holding it down whilst rotating it to change the value. Dial clockwise to increase the temperature, and counter-clockwise to decrease it. Release the orange click-wheel once you have reached the desired temperature.
- To make changes to the duration, select the duration value button and change the value in the same manner as the temperature.
- Once you are done, confirm your changes by clicking on the confirmation button on the right. The properties become locked again.
- If you do not want to keep your changes, you can also use the green back button. In this case the properties also become locked again, but the changes are not kept.
Making changes to a cycle
- Highlight the cycle you want to change by scrolling to it with the orange click wheel.
- Push down the orange click wheel. The cycle is now selected and the properties are editable.
- To change the number of repeats, select the cycle repeat value button at the bottom of the screen. Push down the orange click-wheel and keep holding it down whilst rotating it to change the value. Dial clockwise to add cycles, and counter-clockwise to reduce the number of cycles. Release the orange click-wheel once you have set the desired number of cycles.
- To change the start and end point of the cycle, buttons with a left-right icon are shown on the left and right sides of the cycle.
- To change the start point of the cycle, highlight the button on the left side of the cycle. Push down the orange click-wheel and keep holding it down whilst rotating it. Dial counter-clockwise to move the starting point of the cycle to the left, or clockwise to move it to the right.
- The end point of the cycle can be similarly changed.
- If the last stage is a hold stage, it can not be included in a cycle.
- Once you are done, confirm your changes by clicking on the confirmation button on the right. The properties become locked again.
- If you do not want to keep your changes, you can also use the green back button. In this case the properties also become locked again, but the changes are not kept.
Adding and removing temperature stages
- To add a temperature stage, select a temperature stage next to the position where the new stage should be.
- Push down the orange click wheel.
- A new stage can be added either to the left or to the right side of the selected stage, by clicking on the button with the plus icon on either side of the stage.
- Once the plus has been clicked, a new stage is added on the selected side. The new stage has the same properties as its neighbour that was selected to add the stage.
- The new stage is automatically selected to be edited.
- To delete a stage, click on the button with the bin icon at the bottom left. If the stage is the only remaining stage in a cycle, the cycle will also be removed.

Adding a new cycle
- To add a new cycle, first add three new temperature stages outside of any existing cycle, as described in “Adding and removing temperature stages” above.
- Select any of the new temperature stages, and press down on the orange click wheel.
- Select the cycle icon at the bottom of the temperature stage bar, and click with the orange wheel.
- Set the desired number of cycles.
- Then extend the cycle over the other two temperature stages as described in “Making changes to a cycle”.
- You can then edit each of the temperature stages as described in “Making changes to a temperature stage”.
Adding a touchdown cycle (only available on Bento Lab Pro)
Advanced protocols sometimes require touchdown cycles. Touchdown cycles start off with an annealing temperature that starts off high (for increased specificity), but which decreases each cycle by a set temperature, for a small number of steps. Once the final touchdown cycle is reached, the PCR then continues cycling using the final touchdown annealing temperature for the remainder of the PCR program.
For example, in a touchdown program, the annealing temperature might start at 60 °C in the cycle, reduce by 1 °C for the first nine repeats of the cycle, and end up at 51 °C for the remainder of the program. This example would use nine touchdown steps taking place over 10 cycles (the initial temperature plus each touchdown step).
The remaining cycles can be programmed in two ways: as part of the same cycle steps (e.g. 35 cycles, of which the first 10 are touchdown, and the remaining 25 are at the final touchdown temperature), or as two discrete cycle phases (e.g. 10 cycles touchdown and then 25 cycles with a fixed annealing temperature). Both program types should run the same but are visualised differently.
To add a touchdown step in a cycle, highlight the temperature stage you want to add the touchdown step to.
- Push down the orange click wheel.
- The touchdown button appears between the left and right plus buttons. The touchdown button is only visible if the temperature stage is in a cycle.
- Select the touchdown button and push the orange click wheel.
- The temperature stage is now tagged with a touchdown icon. The icon can be selected to configure the touchdown stage.
- The left option is the temperature delta, i.e. by how much the temperature of the cycle is changed with each repeat.
- The right option determines how many times the touchdown delta will be applied. Multiplying this number with the temperature delta gives you the total amount by which the temperature stage will be reduced.
Configuring the heated lid
- To configure the temperature of the heated lid, select the cog icon at the top right of the editor.
- Push down the orange click wheel.
- The temperature of the lid is now editable. It can be tuned in a similar manner to the temperature of any temperature stage in the editor.
- In addition, the heated lid can be completely turned off and on again by pushing on the temperature value button.
- To confirm your changes, click on the confirmation button on the right. The properties become locked again.
- If you do not want to keep your changes, you can also use the green back button. In this case the properties also become locked again, but the changes are not kept.