Introduction to Gel Electrophoresis

Reagents

*some reagents are not included in the Biotechnology 101 Kit, but can be easily obtained.

  • Gel Electrophoresis Tutorial Bag
  • Distilled or deionized water (1L) – Not included. You can find this on eBay or Amazon.
  • Empty 1L plastic or glass bottle. – Not included.

Consumables

Equipment

Abstract

This guide is the fifth chapter in the Biotechnology 101 Kit, that teaches you the basics of hands-on molecular biology. Gel Electrophoresis is a common analysis method of DNA and it’s the key to visualising your results.


Guide

  1. What is Gel Electrophoresis

    This last introduction chapter will introduce you to Gel Electrophoresis, a method to separate samples of DNA fragments by their size.

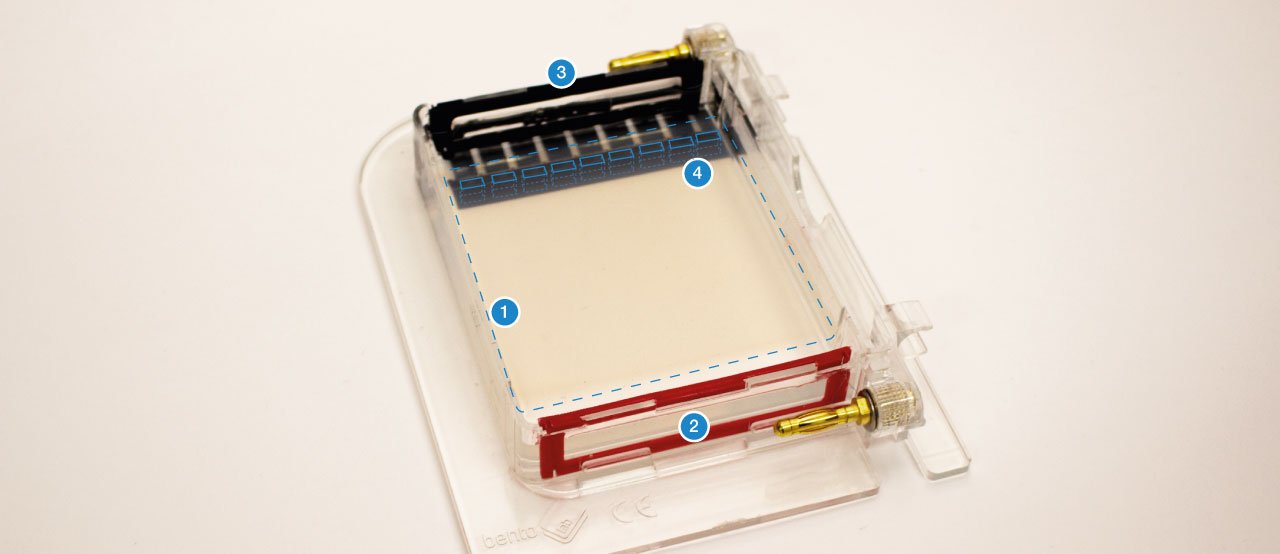
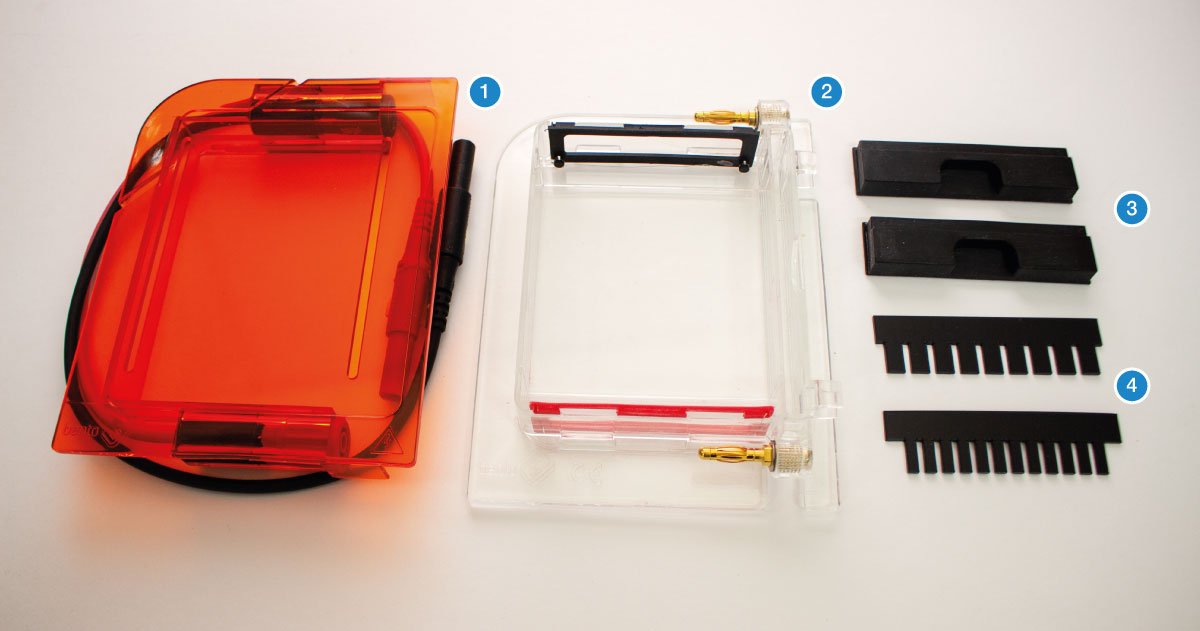
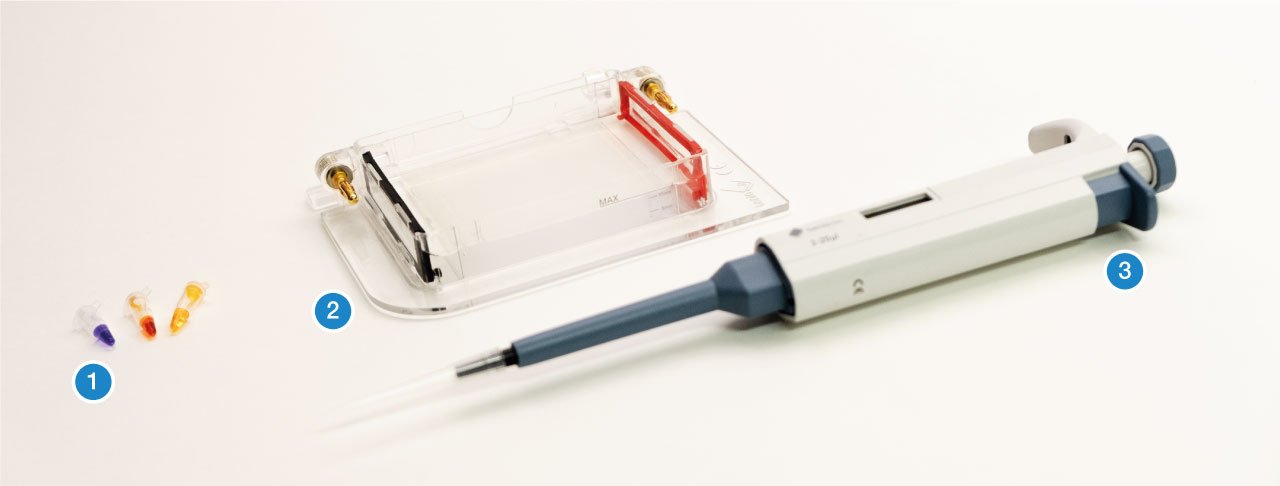
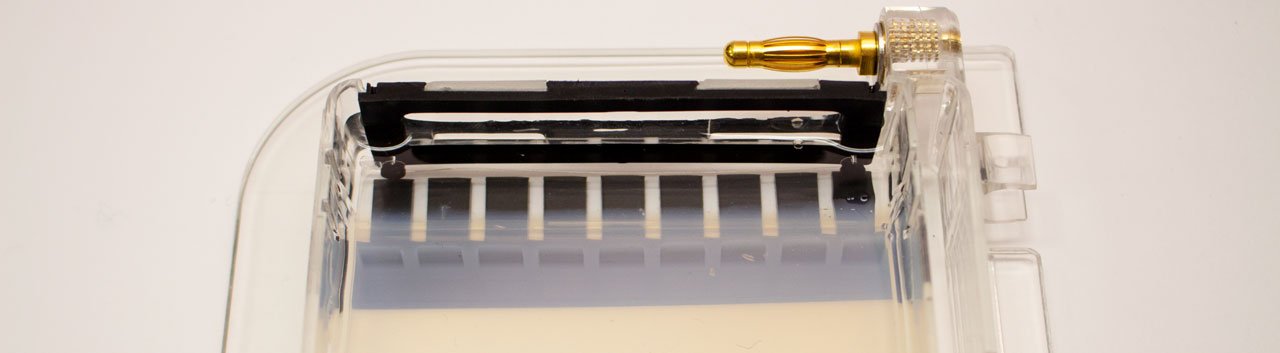
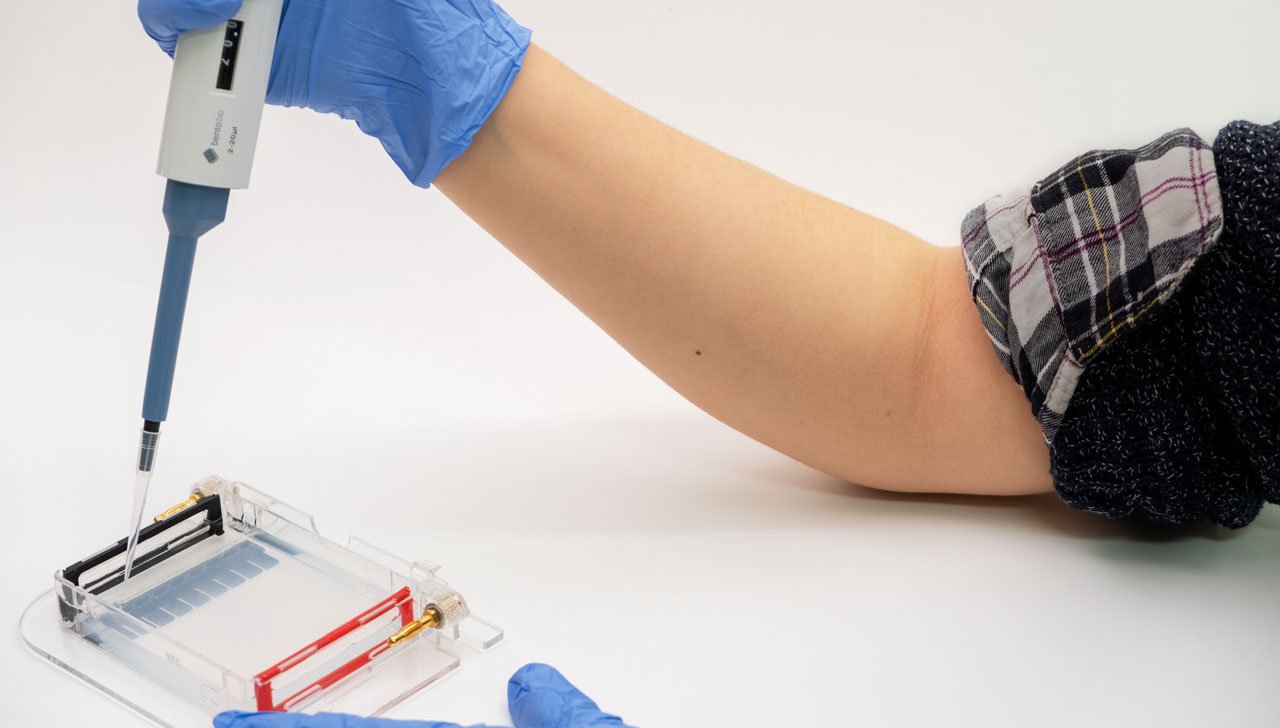
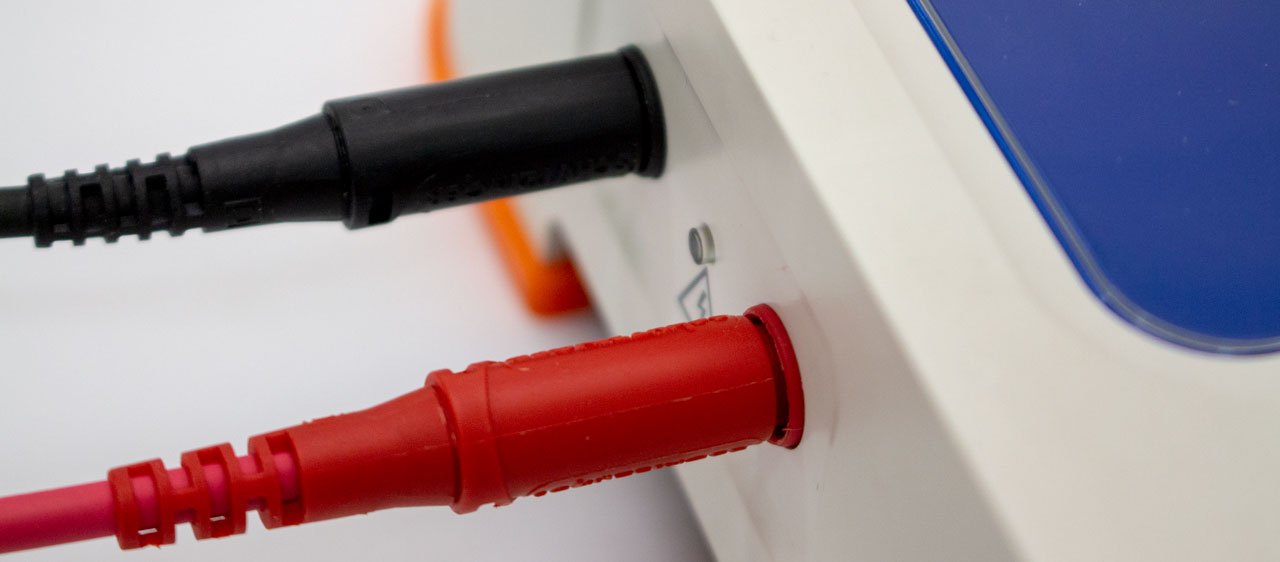
    The gel (1) is a jelly-like substance made from agarose, a sugar polymer extracted from seaweed. The gel is immersed in a buffer solution and has electrodes (2 / 3) on either side, creating an electrical field. The gel is cast with small pockets close to the negative electrode. These are called wells (4). The samples, containing DNA pieces of different base pair sizes, are pipetted into the wells.

    On a molecular level, the gel is not solid, but contains many small pores. Because the DNA molecule has a negative charge, due to its chemical structure, when a voltage is applied, the DNA fragments are pulled towards the positive electrode. The speed at which the DNA fragments travel through the gel depends on their size: Small pieces travel quickly, large pieces travel slowly. After some time, the DNA fragments have been separated and their size can be analysed. Depending on the samples used, the fragment size can give information about their genetic information.

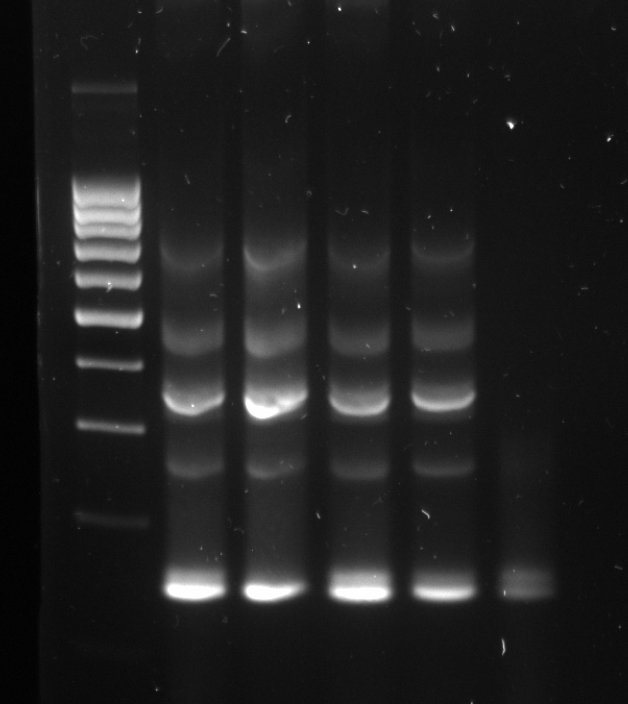
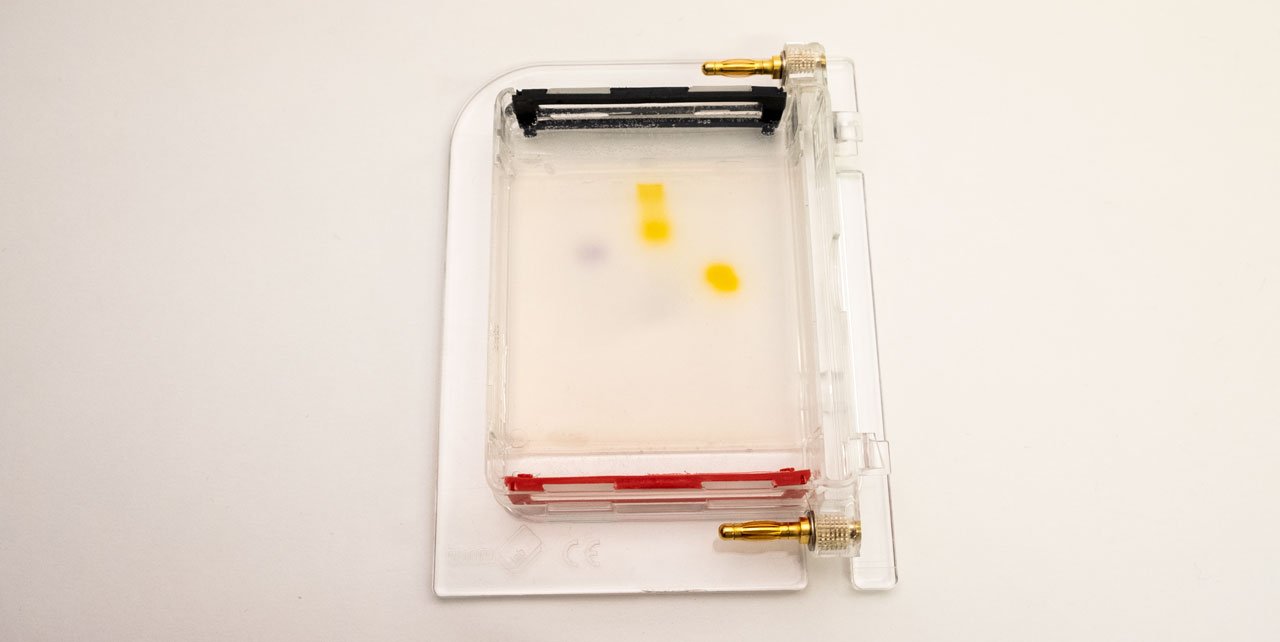
    The gel can be infused with a DNA stain, which will bind to the samples. Using the transilluminator, the samples can then be made to fluoresce, so that they become visible.A typical gel picture looks like the picture above. From each well, the DNA fragments have travelled in their lane have been separated by their size. In the left lane, a DNA ladder has been used. This is a synthetic DNA mixture with fragments of known sizes, which is used as a ruler for the samples.

  2. The Gel Box – A Closer Look

    The gel box contains several parts:

    The orange lid (1) seals the gel box when the voltage is applied and also functions as a filter for the transilluminator, to render the fluorescing DNA visible.The base (2) is used to cast and run the gel. It has the red positive electrode, and the black negative one. Each of the electrodes is made of a thin platinum wire.

    Be careful when touching the electrodes, as the platinum wire is very thin and fragile. Take care when cleaning the gel box, or when removing the electrodes to avoid breaking the wire.

    Two rubber dams are used to create buffer zones around the electrodes during gel casting (3). There are also combs to create 9 and 12 well gels (4).

  3. Buffer Solution

    Both for creating the gel, and for running the gel, a buffer solution is needed. The Biotechnology 101 Kit uses TBE buffer. But before using it, it must be diluted to the right concentration.

    You will need a target container for the diluted 0.5X TBE buffer (1), the 10X TBE concentrate provided by the kit (2), and destilled or deionized water (3), which you can buy online, or in a pharmacy.

    The buffer provided is 50 mL of 10X TBE. You will need to dilute it to a 0.5X concentration, as all the experiments in the Biotechnology 101 Kit use 0.5X TBE buffer. For this, you will need a bottle in which you can store the buffer. You can buy a glass laboratory bottle (1) or you can use a cleaned plastic bottle (2). The volume needs to be one liter.

    To dilute the TBE buffer, you will need to use the distilled or deionized water.

    It’s best not to use tap water for diluting the TBE, as tap water contains many impurities and minerals, which will interfere with the buffer. Distilled and deionized water are available online, on Amazon, or in pharmacies. If you can not source distilled or deionized water, we recommend bottled filtered drinking water over tap water.

    Pour the 10X TBE buffer into your container. Add distilled or deionized water up to the 1L mark. The new buffer solution is now 0.5X TBE, as you have diluted 50mL of 10X concentration to a 1L volume. Label your diluted buffer 0.5X TBE buffer, and store it in a dark, cool place. You will need it for the projects of the Biotechnology 101 Kit.

    What is buffer?

    In gel electrophoresis, the buffer provides ions that carry a current through the gel, and to maintain a constant pH. There are a variety of buffers, and one of the most common for DNA separation is TBE buffer. TBE buffer is a buffer solution containing a mixture of Tris base, boric acid and EDTA. The Boric acid and Tris base helps the DNA stay soluble in water. The EDTA protects the DNA against enzymes degrades the DNA.

    How to calculate concentrations

    You can plan dilutions by calculating the unknown quantity using the formula C1V1 = C2V2, where:
    Concentration 1 * Volume 1 = Concentration 2 * Volume 2

    For example, we are starting with:
    C1 (10X)
    V1 (0.05L)
    C2 (0.5X)
    V2 = ?
    (10X)(0.05L) = (0.5X)(1L)

  4. Mixing the gel

    Once you have created your 0.5X TBE buffer solution, you are ready to mix your first gel. You will create a 1% agarose gel.

    Often, agarose is provided as a powder, which you will need to weigh exactly to create the right gel. But the agarose in the Biotechnology 101 Kit is provided in a tablet form, so they are already exactly measured.

    1% refers to the percentage of agarose in the volume of liquid. The gel percentage is calculated as (grams of agarose / milliliters of buffer) x 100%. In this gel, we are mixing 0.5g with 50mL, so the calculation is 0.5g / 50 mL x 100%, which gives us a 1% gel.

    The standard percentage of agarose for a gel is usually about 1%. The percentage of agarose that is appropriate depends on the size of DNA fragments you are expecting to separate. The percentage of agarose determines how well the DNA separates, and the resolution of the final gel.

    To make the gel, you will be dissolving one agarose tablet (2) in the 0.5X TBE Buffer (3),You can use the glass beaker (1) that comes with the Biotechnology 101 Kit.

    Always wear gloves when working with gels. This is because they are usually stained with a DNA stain, which can be toxic. Although the stain provided in the Biotechnology 101 Kit is considered safe, you should always wear gloves when handling the stain or stained gels.
    In this introduction protocol, you will not stain the gel, so the gloves are not necessary. But it’s still a good idea to get used to only handling gels with gloves.

    Drop two agarose tablets into the beaker, then fill with 0.5X TBE Buffer to the 50 mL mark. Wait for the agarose to dissolve. This might take a few minutes. Swirl the partially dissolved tablets in the buffer occasionally.

  5. Preparing the gel box for casting

    In this step you will set up the gel box for casting the gel.

    First, slide open the gel box.
    Ensure the black buffer dams are installed correctly, then install the 9-well-comb.

  6. Heating the gel solution in the microwave

    Make sure the agarose tablets have fully dissolved in the buffer. It can take a few minutes.

    Once they have dissolved, heat the solution in a microwave at full power for short bursts of 20-30 seconds.

    Avoid heating the gel solution for too long, or the water in your buffer will start to evaporate. We recommended you heat in short bursts, stop when you see bubbles appearing and swirl the solution. If you over boil the solution, you will end up with a higher percentage agarose gel with a high ionic concentration.

    After each burst of microwaving, take our the beaker and swirl the solution. Once bubbles start appearing, the agarose should have dissolved. If you still see visibly solid pieces or strings of agarose, continue until they are dissolved.

    Be careful when handling the beaker, as it might get very hot. Hold the beaker by the rim while taking it out of the microwave. Touch it indirectly using a cloth or gloves.

  7. Pouring the gel

    At this point, you would usually add the DNA stain that will bind to the DNA and make it fluoresce. However, in this first introduction, this is not necessary.

    Once the agarose is fully melted and dissolved, let it cool to about 55°C – it should feel hot, but not too hot to touch.

    Avoid pouring agarose above 70°C, as this will lead to warpage of the gel box and comb.

    When the agarose is at the right temperature, pour it slowly into the gel box until the 5mm mark. Pour slowly to avoid disturbing the comb or knocking it out of place. If the comb moves, put it back in place.

    It will take about 30 min for the gel to solidify at room temperature. To speed up the process, you can also put the gel tray into the fridge.

    Ensure that the gel box is on a level surface until the gel has solidified. Otherwise the gel thickness will not be consistent.

  8. Removing the comb and buffer dams

    Once the gel has solidified, remove the comb and the buffer dams.

    Be careful not to damage the gel as you remove the comb and dams. When removing the comb, make sure not to pierce the gel.

  9. Gel Buffer

    In this step, you will finish setting up the gel by adding the buffer.

    Use your prepared 0.5X TBE buffer solution again, and pour it over the gel until the gel is fully covered. The buffer should reach about 2-3mm above the gel.

  10. Loading the gel

    The gel is now ready to load.

    For this exercise you will need the dyes from the Introduction to Gel Electrophoresis bag (1). These will be the samples you will load into the wells of the gel (2), using the micropipette (3).

    Loading samples into a gel well is one of the trickier pipetting skills you will need to master.

    If you have not used the micropipette recently, have a look through the materials in the Introduction to Pipetting chapter.

    If you are working on a bright surface, the wells in the gel can be hard to spot. Place the gel tray on a darker surface to increase the contrast and see the wells more clearly. The comb can also be used for this.

    There are nine wells in the gel, so you can load each dye three times.

    Set your pipette to 20μl. Put a tip onto the micropipette. You can use the same tip for all of the samples – there is no need to change the tip.
    Draw up 20μl of one of the sample dyes.
    Slowly enter a well of the gel with your pipette tip. Take care not to pierce through the gel at the bottom.
    Once the pipette tip is located in the well, expel the dye. It should sink down and stay in the well.
    Then move up the pipette tip out of the well slowly, taking care not to disturb the sample that you just deposited in the well.
    Make sure you don’t draw up buffer into the pipette tip accidentally and only release the pipetting button once the tip is out of the gel.

    To make pipetting into the well easier, put both elbows on the table. You can also support the pipette with your second hand and use it to help guide the tip into the well.

  11. Running the gel

    Once you have loaded all the wells, you can run the gel. For this you will need your Bento Lab.

    First, slide on the gel box lid.

    Now connect it to the Bento Lab power supply.

    When moving the gel box, be careful not to spill buffer.

    On Bento Lab, select the Gel Electrophoresis module.

    Set the voltage to 50V (1), then set a timer (2) to 40 min (3), and start the run (4). The LED between the red and black power output on Bento Lab will turn on, and bubbles will appear around the electrodes, indicating electrolysis.

  12. Results

    After the gel has run, you can turn off Bento Lab and disconnect the gel box.

    Slide off the orange lid, so you can clearly see the results of the electrophoresis run. The orange lid will have some condensation on it.

    You can pour away the buffer. It’s safe to discard in the sink.

    What does the gel look like? Depending on what dye was loaded in each well, each lane will have a colour at a different position.

    The dyes have different molecular weights and sizes, which is reflected by their different positions in the gel.
    Smaller molecular fragments travel quickly through the gel, and thus are furthest down.
    Larger molecular fragments can only travel slowly through the gel, and thus are further at the top.

    The same principle applies to fragments of DNA, and thus their relative position on the gel indicates their sequence length.

  13. Visualisation

    When you run actual DNA samples in the gel, as you will in the project-based experiments of this kit, you could now visualise the gel using Bento Lab’s transilluminator.

    However, as the focus of this activity was casting and loading the gel, and the samples you were running only contained dye, not DNA, you will not see any fluorescence.

    To use the transilluminator in later experiments, you will place the gel tray onto the blue transilluminator surface of Bento Lab.

    On the interface, you can change the light by clicking the light bulb button (1).

    For ideal visibility, this should be performed in a dark room. Through the orange lid, you will be able to see the bands of DNA fluoresce at their positions in the gel. You can hold the orange lid over your phone’s camera lense to take a picture and document your experiment’s results.

    Using the transilluminator in a dark room will give you the best results, but it is also possible to see results in daylight. The less light reaches into the gel box, the better. So if it’s not possible to close the curtains and reduce the light in your room, you could get creative to block light. For example, you could use a piece of black cardboard or a jacket to block out light.

    You can also remove the gel from the tray and place it directly onto Bento Lab’s transilluminator surface for slightly improved transillumination. If you do this, make sure to wear gloves. Be gentle with the gel to avoid breaking the gel as you do this.

  14. Clean Up

    Once you are done and have documented your result by taking a picture, you can discard the gel into the trash. Don’t touch it directly, but handle it with gloves.

    If you touch the gel with your hand by accident, wash your hands with water right away. However, the stain provided by this kit is safe to handle.

    If you placed the gel directly on Bento Lab’s transilluminator surface, wipe it with a dry cloth.

Welcome to our community.

Get our monthly biotech tips in your inbox, and we’ll send you a code for $10 off your next order.