GM Plant Detection

Reagents

  • PCR Materials bag
    • PCR beads (1)
  • GMO Primers (stored in the green refrigeration bag)
  • Gel electrophoresis
  • Salt. Not included.

Consumables

Equipment

Abstract

In this project, we will be searching for a DNA sequence that is present in roughly 85% of genetically modified crops: the transcription terminator of the nopaline synthase (NOS) gene of the soil bacterium, Agrobacterium tumefaciens. This bacterium has the natural ability to insert its DNA into a host plant. Scientists can use this natural ability to deliberately transfer genes into plant genomes, to create a GM plant. During this process, the bacterium’s NOS transcription terminator remains in the plant’s genome.

What are we testing?

A transcription terminator – usually just called a terminator – is a DNA sequence that marks the end of a gene for transcription. The NOS terminator is a 127 bp sequence found in genetically modified plants. In addition to their own chromosomes, plants contain organelles with DNA called chloroplasts. chloroplasts contain their own genome. In addition to the NOS termiantor, we will also amplify a 400 bp DNA fragment of the chloroplast DNA as a control sequence to confirm that there is plant DNA in the sample.

Overview

What are the possible results for this experiment?

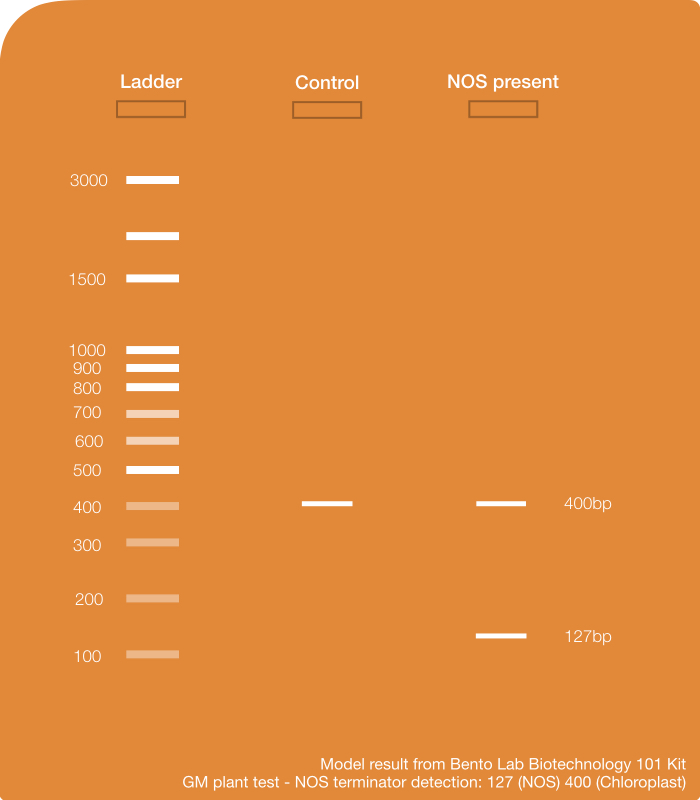
There are two possible results. If the PCR reaction works, we should observe at least one DNA band: the control sequence, the chloroplast DNA. If the plant has been genetically modified using the Agrobacterium tumefaciens technique, then we should see the chloroplast DNA and a band for the NOS terminator.

  • Chloroplast: the PCR reaction worked, and there is plant DNA present
  • NOS terminator: There is a copy of the NOS terminator in the sample, which means it has been genetically modified using the Agrobacterium tumefaciens technique.

Protocol

In this project, you will first extract DNA from plant samples. This will take about 20 minutes. After this, you will use PCR to amplify both Chloroplast and NOS terminator genes. This will take about 90 min, but most of it will be waiting time.
Finally, you will visualise the results using Gel Electrophoresis, which will take about 45 min.
At the end of each section, you can continue right away, or store your samples and continue later.

  1. DNA Extraction

    First, obtain the DNA sample. Use the DNA Extraction from tissue. It will take ca 20 min, at the end of which you should have a clean DNA template sample in a PCR tube.

  2. PCR

    In this step, you will use PCR to amplify both the chloroplast DNA and NOS terminator.

    The experiment uses a method called duplex PCR, where two different DNA targets are amplified in the same PCR experiment by using two separate primer pairs.

    You will need the DNA template sample (1), a PCR tube with a mastermix bead (2) and the primer mix for this project (3).

    Set your micropipette to 20μL.

    Using a fresh pipette tip, transfer 20μL of the primer mix into the PCR tube with the mastermix bead. Then discard your tip.

    Now set your micropipette to 4μl.

    Using a fresh pipette tip, transfer 4μl of the DNA template sample from the sample tube into the PCR tube with the mastermix bead and primer mix. Then discard your tip.


    Place your PCR tube in the thermocycler block.

    Set up the thermocycler with the following PCR program:

    • 120 sec at 94°C
    • 35 cycles made of 3 steps
      • 30 sec at 94°C
      • 30 sec at 55°C
      • 30 sec at 72°C
    • 120 sec at 72°C

    If you need help operating the Bento Lab thermocycler, check the manual. You can use the PCR  preset (1), then modify (2) the program to the required settings (3) before running the program (4).

    The program will run for ca 2 hours. When it is finished, you can keep the result in the freezer, or use it right away for gel electrophoresis.

  3. Gel Electrophoresis

    Follow the Gel Electrophoresis Protocol to cast a gel and run it with your PCR result, and a 100bp ladder. This should take about 40 min.

  4. Visualising the Gel

    After the gel run has completed, you can visualise your results.

    Continue to wear gloves as you handle the gel.

    Open the orange lid of the gel box, and wipe off the condensation.  

    Gently pour out the buffer, and dispose of the buffer down a drain.

    Drain disposal of TBE running buffers is a standard waste disposal procedure followed by research labs. If you have questions, get in touch with us.

    Place the gel box onto the Bento Lab transilluminator surface. In order to get best visibility, you should do this in a room as dark as possible.

    Turn Bento Lab on, select the Gel Electrophoresis module, and turn on the Transilluminator light.

    Hold the orange filter lid over the gel to visualise the DNA bands. For documentation, use your mobile phone to take a clear picture of the gel. Rather than holding the lid over the gel, you can hold the lid directly in front of your camera lense.

    If the bands are faint, try to reduce the light in the room, e.g. by closing the curtains and turning off the lights.  You can also carefully take the gel out of the gel box and place it directly onto the transilluminator. Wear gloves when doing this, and be careful not to break the gel.

  5. Analysing your results

    Compare the picture of your gel to this example result, which has been run with all variations. Your sample should correspond to one of these variations.

    1 – Ladder – 100 bp DNA Ladder

    2 – Control
    Chloroplast control (400 bp)
    This result shows a plant that has not been genetically modified using the Agrobacterium tumefaciens technique. There is a band present for the Chloroplast DNA, so the PCR reaction has worked, however there is no band present for the NOS terminator.

    3 – NOS present
    Chloroplast control (400 bp), NOS terminator (127 bp)
    This result shows a plant that has been genetically modified using the  Agrobacterium tumefaciens technique. There is a band present for the Chloroplast DNA, and a band present for the NOS terminator.

    After you have taken good photos of the gel for your documentation, you can dispose of the gel in your regular trash.

    Disposal of agarose gels is a standard waste disposal procedure followed by research labs. If you have questions, get in touch with us.

Welcome to our community.

Get our monthly biotech tips in your inbox, and we’ll send you a code for $10 off your next order.